Showing posts with label 3d model. Show all posts

Monday, 1 May 2017

Suit Progress | Maya | Adaption B | Year 2


This is how Skullduggery's suit is looking so far! I think I've managed to get a nice shape with good definition to the suit and tie when the model is un-smoothed as well as smoothed. The collar doesn't match with my orthographs but I think the way I have modelled it looks a lot smoother.

Friday, 12 February 2016

Pre-Vis | Work in Progress | Main Factory | From Script to Screen


I've been struggling with the layout of my factory and how to draw it for my storyboards so I have created a quick mock up which will be used as part of my pre-vis. Although it is not completed it is really helping with how my factory layout could potentially be seen and will be a great help when drawing these scenes. This is a work in progress and may potentially change layout as I begin to draw my storyboard out more for the animatic.

Wednesday, 10 February 2016

Pre-vis Set | Maya


We created a basic set in Maya for use as a Pre-vis. Its in the style of an old school detective office. I've mapped out a few basic items like some lights, rug, desk, chair and two bookshelves full of books. Its fun to create sets like these as you can create a basic set quite quickly without worrying about the poly count.

Thursday, 10 December 2015

Part Textured Scene | Hibernaculumis | Work In Progress | Maya

I've started the texturing process and plotting in some basic window shapes. I'm not sure if they seem too clustered yet but I will add them to the other buildings first in this manor before I make a better decision.

UVs Completed | Hibernaculumis | Work In Progress | Maya


All the buildings have been modelled, the trees and path added and I've applied the UV map to everything!

Wednesday, 2 December 2015

Making the Buildings in 3D | Maya | What If

I've finally started making my buildings. I struggled with this for a few days trying to make these from shapes such as cylinders but I've since realised that as long as I get the correct angle, I can make them via block modelling. A lot of the shapes used to make these buildings are repeated but have been rescaled. This is helping with the pace of working and is creating some great results.

Monday, 30 November 2015

Alleyway Scene | Complete | Tutorial | Maya

AO pass, Diffuse pass, Matt pass


Final image after photoshop

Here is the finished Alleyway scene. This was great to make as I've definitely learnt a lot about this process. It was a lot more intensive than I first thought it would be but it has given me a great insight into what to do with my city when I create that in Maya too.

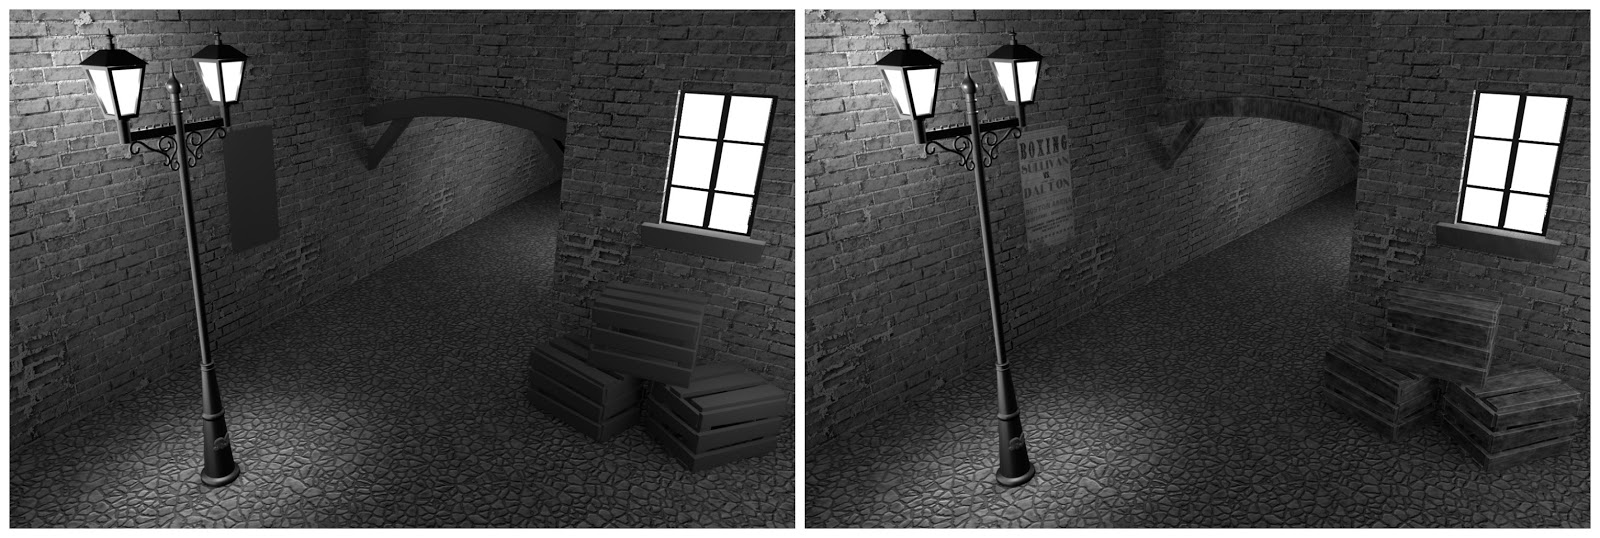
Texturing | Alleyway Scene | Tutorial | Maya

Left - walls and floor complete
Right - wood and poster complete
With the texturing completed (part 4 complete) I thought now would be a good time to post an update before I finish the bump, spec and final composite.

Saturday, 28 November 2015

Alleyway Update | Lighting | Tutorial | Maya | Screenshots

The lighting is now done for the alleyway scene. These are the 12 renders I took of the scene throughout the process from start to finish.

Sunday, 22 November 2015

Alleyway Update | Tutorial | Maya | Screenshots


I'm part way through the lighting tutorial and I realised I hadn't posted an update on the Alley Way scene for a while! The UV layout is complete. This process took slightly longer than I anticipated as moving the file backwards and forwards from uni (Windows computer at uni, Mac at home) is messing slightly with the material that I had assigned. Now I have worked out how to change this back and fix it, it is a very quick change before continuing. Now onwards onto the lighting!

Thursday, 5 November 2015

Alleyway Update | Tutorial | Maya | Screenshots

Main alleyway complete

Side view of lamppost so far

Top view of lamppost so far

I realised that since we have been creating the alleyway I haven't posted any screenshots of the work! I've been working from the online tutorials and have so far completed the main walls to the alleyway and part of the lamppost. I have had several problems with this at home as the images that I imported into the scene do not appear when on the computer at home. The first video and the UV layering will be completed before class on Monday.

Tuesday, 13 October 2015

Texturing Part 2: UV Layout | Tutorial | Complete | Screenshots | Maya


I struggled a lot with this tutorial, not due to the video itself but due to Maya randomly deciding to start using soft selection for no reason which made it look like lava (see below)


After a bit of help from Charlie, I managed to turn this feature off before starting. I found it a very easy process and can see how it would be helpful in the future but I think I would also need a paper version to work with so I could understand the direction in which the detail would need to go.

Tuesday, 6 October 2015

Texturing Part 1: Common Shaders | Tutorial | Complete | Screenshots | Maya


This is the work from Monday's lesson. Unfortunately there were several problems with the computer I was working on which resulted in it crashing several times, so instead, I took notes and have done it this evening with some help from the online tutorial.

It was great to learn how to render objects in this way, as I think they could come in very handy in the future. I think they all went very well, although I think the gold render does need tweaking as it looks slightly to orange.

Thursday, 1 October 2015

2nd Maya Tutorial | Ray Gun | Extension | Screenshots | Maya


I was so impressed by myself for completing the Ray Gun tutorial, that I thought that I would experiment a bit with the program and create a Steampunk Ray Gun. I remembered all of the tools and how to render it in toon so I tried to apply copper and gold effects to give it more of an authentic vintage look. I have two final render images above, one without the toon line and one with, just because I couldn't decide which looks better!

2nd Maya Tutorial | Ray Gun | Complete | Screenshots | Maya


Here is the completed piece from the second Maya tutorial. The pictures above show the 'toon' ray gun, fully rendered from two slightly different angles.

I did originally start this piece in class but I had several problems with the vertex's and was actually only editing one side of the shape which made for some pretty funky results! So I thought it would be best to restart this tutorial from scratch and I am in love with my final result!

Saturday, 26 September 2015

Goblets | Practise | Screenshots | Maya

After completing the egg cup tutorial, following the video as a step-by-step guide, I wanted to test if the skills I had learnt from it had really sunk in. I decided to test myself and remake the egg cups from memory. Making goblets seemed like more of a challenge and I thought I would struggle without referring to the video.


I was so wrong! I created 4 goblets and was very pleased with the outcome. I did check with the video that I was extruding the top and bottom planes of the Poly cylinder correctly but didn't have any major problems! I definitely feel so much happier using Maya and cannot wait to try more of the tutorials and see how much I can challenge and push myself along the way!


Wednesday, 23 September 2015

1st Maya Tutorial | Goblets | Complete | Screenshots | Maya

Here is a screenshot of my final 4 egg cups from the 1st online Maya Tutorial. Despite struggling for a bit, I'm still very proud of my ability to complete the task and I have learnt so much along the way. 
It shows the polygon eggcup completed with the SUBD and poly smooth egg cups along side. 
If I have some free time, I think I may create some of my own objects using these techniques to ensure that I completely understand everything that I have learnt during this tutorial. 

1st Maya Tutorial | Goblets | WIP | Screenshots | Maya

This is a screen shot of my work so far on the 1st online Maya tutorial. I think I've done really well and have improved massively on the NURBs egg cup and really refined the shape down. The shape is really smooth and refined compared to my last attempt and I do have more of a straightened edge to the first. Using NURBs was a lot easier today as what I had learnt in lesson had sunk in and taken effect. I'm also beginning to understand the process a lot more as well as remembering where buttons are in the menus and which arrow keys to use.

I'm part way through creating the 2nd egg cup using the polygon method and so far, I feel very happy with my work. I've had a few hiccups due to using the wrong arrow tool and was redefining just one plane of the stem and not the whole outer edge. I understand this mistake and now I've corrected myself, I feel a lot more confident with the program.

First Maya Lesson | Egg Cups | Screenshots | Maya


These screenshots are from my first Maya lesson. The top image shows my first model ever. This was my attempt at creating an egg cup during class. The image below was me manipulating it to make it into a birdbath so I could get used to using the tools and arrows to move parts. I think I did a good job for my first ever model but I will remake the egg cup when doing the online tutorial for the introduction to Maya.